Set your chatbot's identity, tone, and boundaries
Use Persona Builder, system instructions, and the persona library to create a consistent communication style.
On this page
A persona defines how your chatbot introduces itself, writes, and handles its subject area. Your knowledge sources provide the facts; persona and system instructions guide the response style and behavior.
Before you begin
Decide who the assistant represents, what it helps with, and which topics should be redirected to a person. Prepare a short style example and approved wording for any disclaimer. Keep your instructions consistent across Persona, General, and Widget settings.
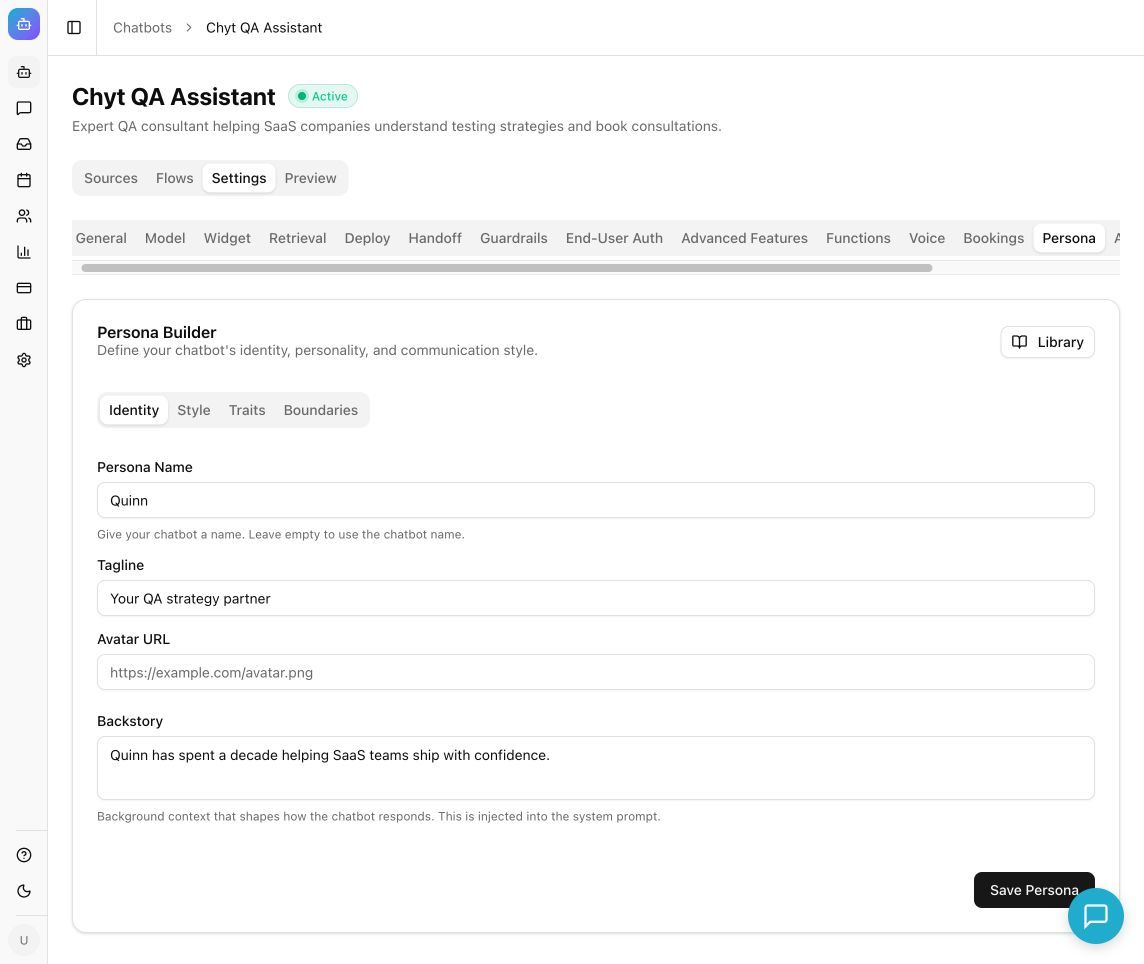
Example from the Chyt.ai dashboard (September 2026).
Define the identity
- Open the chatbot's Settings → Persona.
- In Persona Builder, select Identity.
- Enter Persona Name, such as “Acme Support Assistant.”
- Add a Tagline and optional Avatar URL.
- Write a concise Backstory explaining the assistant's role, audience, and approach.
Describe the assistant accurately. A useful backstory might say it helps customers use your software and explains steps patiently; it does not need an invented biography.
Choose a communication style
- Select Style.
- Adjust Vocabulary Level for your audience, from simpler language toward more academic wording.
- Set Formality.
- Choose Response Length.
- Enable Use Emojis only if that matches your brand.
- Select Traits and choose the qualities you want to emphasize.
These are response preferences. They do not guarantee an exact word count. For a technical upper limit on answer length, use Settings → Model → Advanced response settings.
Set boundaries and save
- Select Boundaries.
- Add Allowed Topics, pressing Enter after each topic.
- Add Prohibited Topics for subjects the assistant should decline or redirect.
- Enter an optional Custom Disclaimer.
- Select Save Persona.
- Open Preview and test an ordinary question, an off-topic request, and a request that needs an escalation.
Persona boundaries are instructions to the model. They are not a substitute for access controls or any separately configured Guardrails.
Align the system prompt
- Open Settings → General.
- Review System Prompt.
- Explain how the assistant should use its knowledge and what to do when information is missing.
- Remove instructions that conflict with your chosen persona.
- Select Save Changes and retest.
For example: “Explain answers in plain language. Use our provided knowledge for product and policy details. If a detail is unavailable, say so and offer our published support route.” Avoid embedding changing policy facts in a long prompt when a maintained knowledge source would be clearer.
Reuse a persona
- Return to Settings → Persona and select Library.
- Use Save Current Persona to give the current configuration a reusable name.
- To reuse a saved entry, choose its apply action in Saved Personas.
- Review the populated configuration.
- Select Save Persona on the chatbot to persist the applied settings.
Expected result: the chatbot has a saved identity and responds in the intended style during new tests.
Troubleshooting
If the style seems inconsistent, check for conflicting text in the system prompt and Widget → Behavior → Persona & Tone. Use Clear in Preview before retesting so earlier conversation context does not dominate the comparison.
If the tone is right but facts are wrong, update Q&A knowledge or retrieval. If the welcome message or visible widget avatar needs changing, use Widget customization.