Publish a website widget or standalone chat page
Activate a chatbot, enable deployment channels, install the exact embed snippet, and verify the visitor experience.
On this page
A chatbot needs an active deployment and the appropriate channel enabled before visitors can use it. The website widget is a floating chat bubble; the standalone app is a full-screen chat page you can share.
Before you begin
Finish your source, model, and persona checks in Preview. Confirm the chatbot's knowledge is suitable for its intended audience. To embed a widget, you need permission to edit your website's HTML or its custom-code settings.
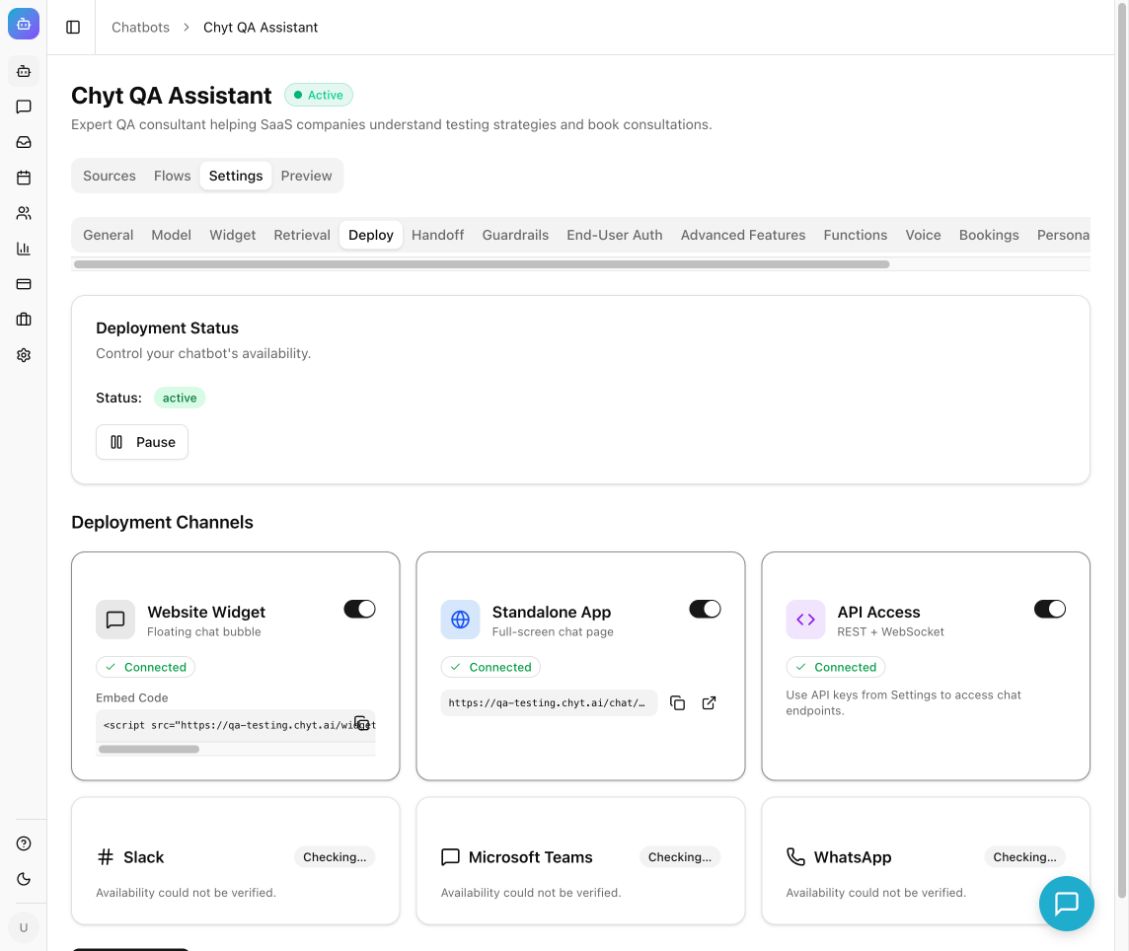
Example from the Chyt.ai dashboard (September 2026).
Activate the chatbot
- Open the chatbot's Settings → Deploy.
- Review Deployment Status.
- Select Deploy if the chatbot is draft or paused.
- Confirm that its status changes to active.
- Under Deployment Channels, enable Website Widget, Standalone App, or both.
- Select Save Channels.
The creation wizard provides Deploy & Go Live for the initial launch. Later deployments and pauses are managed in the chatbot's Deploy settings.
Install the website widget
- Enable Website Widget and save the channel setting.
- Copy the Embed Code from that card.
- Open your website editor or source code.
- Paste the copied script before the closing body tag, or into the platform's supported site-wide custom script area.
- Publish your website's change.
- Open the public website and find the launcher in the configured corner.
- Open the widget, send a real test question, and check the answer.
Use the exact snippet generated by your workspace. It contains both the widget script address and this chatbot's data-chatbot-id value. Copying a snippet from another workspace or chatbot can display the wrong assistant.
For a content management system, confirm that its chosen code area permits JavaScript. A normal rich-text block may display the snippet as text or strip it. Add the snippet once per page rather than embedding duplicate copies.
Share the standalone app
- Enable Standalone App and select Save Channels.
- Copy the address from its card or open it using the external-link action.
- For a chatbot intended for anyone with the link, review Settings → General → Public Access, enable it as appropriate, and select Save Changes.
- Review any End-User Auth or visitor-verification requirements you have configured.
- Open the copied address in a visitor context and complete a test conversation.
- Share that address through your chosen customer-facing location.
Use the copied workspace URL and chatbot slug rather than building the address from the chatbot's display name.
Verify the launch
Check the greeting, branding, starter questions, a factual answer, and the behavior for an unknown question. Repeat on a narrow mobile screen. If you require visitor authentication or contact verification, test that path too.
Expected result: the chatbot is active, the selected channels are saved, and a visitor can open and use each published experience.
The Connected badge on a web-channel card indicates that the option is enabled; it is not proof that your external website has installed the snippet correctly. The visitor test provides that confirmation.
Pause or change availability
Select Pause under Deployment Status to pause an active chatbot. To change one channel, adjust its switch and select Save Channels. Recheck the public experience after the change.
Slack, Microsoft Teams, and WhatsApp have separate setup and availability checks. Their presence in Deploy does not mean they are connected or available on every plan.
Troubleshooting
If no launcher appears, check the published page contains the script, the script is allowed to run, the chatbot ID is correct, the chatbot is active, and Website Widget is saved as enabled. Check your site's security policy or script manager if it blocks the embed.
If the chat page opens but cannot answer, check source readiness, model availability, trial or plan state, AI credits, and any visitor limits. See Troubleshooting and Widget customization.